
It’s hard not to be impressed by the stunning range of stock images available to website owners. They’re sleek and professional, and it’s incredibly quick and easy to find images to match your brand colours to help create a polished and aesthetically pleasing website.
However, are they really bringing your local area and ultimately your business to life and creating that natural organic engagement visitors are looking for?
Probably not.
We’ll be honest, as far as building a website is concerned, our developers love stock images every day of the week. They’re less hassle, come in the perfect format, size, and resolution to get the job done quickly and easily, but as we all know, easy isn’t always what delivers the best results, and sometimes a little extra time and effort can make the world of difference.
That’s why we suggest getting out and about with your camera and capturing your local area in all of its glory and using your images throughout your website, such as on your homepage, page headers, area guides, blogs, and news posts.
Using local images is also a great way to show off your local knowledge and showcase what a great area you cover.
An added bonus is cost. You’re out and about every day, so why pay for expensive stock images when you can create and update your website regularly with images that truly reflect everything your area has to offer.
The one big caveat in using your own images is QUALITY.
Modern websites and today’s discerning clients and customers are less forgiving than they once were, so it’s important that your images are of high quality, and are created with responsive website resizing constraints in mind.
Sound complicated? We can assure you; it certainly isn’t.
In this day and age, every agent at the very least should be using a Hi-Res digital camera for their property pics as standard. If you’re not, shame on you, it’s not the 90’s! And no, your mobile phone images certainly won’t cut it. You don’t need to splash out on a super expensive piece of kit and enough equipment to shoot a National Geographical cover, but good quality photos require a good quality camera.
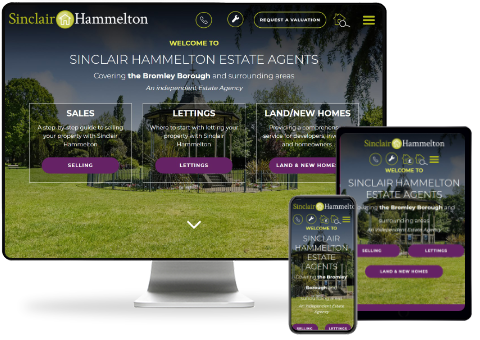
Getting the layout right.
The next most important requirement is making sure the image focal point is in the right place to allow for resizing on all devices.
The golden rule is to make the focal point central, with enough clearance at both sides and top and bottom to keep it in the picture on any device, without chopping something off that will diminish the image’s impact.
Here’s an example:
What size and format are best.
The bigger the better! We can shrink an image to fit, but going the other way will leave it pixelated and grainy.
Web page images should be at least 1200 x 700 pixels at the bare minimum, and preferably 2000 x 1500 pixels to give us plenty of wriggle room.
Blog and news page images vary according to your website layout. If yours require full-page images, use the same size and dimensions as above.
For square images, 1800 x 1800 pixels or above should be used.
Jpegs are best and are less likely to slow down page loading times as they are a smaller byte size than PNGs.
So why not give it a go?
Try it out on your blogs, news articles, and area guides, and then when you feel really confident about using your own images, start making the rest of your site a virtual gallery of your area.
You could even go the whole hog and add an area gallery to your site and tickle Google’s fancy by naming the page “[Area} in pictures”, and add an “alt tag” to each image so Google can find them. Of course, our team can do all of that for you.
What are you waiting for? Go and get snapping!
Search Jungle Drums
Categories:
- Finance & Mortgages 9
- Legislation & Compliance 24
- News from The Jungle Drums 134
- Portfolio 1
- Property Market 57
- Proptech & Innovation 72
- Sales & Marketing 95
- Uncategorized 14